Arch Linux Installation in a Nutshell
A guide to install Arch Linux on UEFI Systems with Secure Boot
Introduction
Arch Linux is an open source, rolling release distribution. The OS is designed to be intentionally minimal and gives the choice of customization to the user. While this may sound interesting, this means it’s the responsibility of the user to manage basically everything.
For this reason, the OS is known for the difficulty of use. People who achieve this are usually given the universal right to use the phrase i use arch btw.
I personally daily drive Arch mainly because
- It’s minimal
- It features a good package management system (
pacman) - It’s an oppurtunity for one to learn things myself as I’m forced to customize things myself
- It’s a rolling release distribution. This means I get package updates very quickly. For some other distributions like Ubuntu, you would have to wait till the next release for major package updates like new versions of GNOME
This blog is a brief guide to install the OS. I believe the Arch Wiki itself is the best guide for not just installation, but almost everything Linux config related. But as per the request of some of my friends, I decided to prepare a brief guide to cover the installation procedure in a nutshell.
This guide is for installing the OS on UEFI systems. Skip the sections with (Secure Boot) on the title if you do not intent to use Secure Boot.
Do comment below for suggestions, feedback and doubts.
Prerequisites
It is recommended that you learn the basics of the topics below before you proceed to installation.
- UEFI
- Secure Boot
- Disks and Partitions
- Dual Boot
Getting Started | Download ISO
You can download the official ISO image from Arch Linux download page. You can use Rufus in Windows or GNOME-Disk-Utility or any other tool to burn the ISO to a flash drive.
This image won’t work on Secure Boot enabled systems as the official images are no longer signed. There are however ways to sign the official ISO by using custom keys or by repacking the ISO with a signed copy of Preloader. If you find it difficult to do this, you can turn off Secure Boot for the installation procedure.
I maintain an archive for hosting some files and repo content. You can download the repacked iso from there or follow this guide for doing it yourself.
- archlinux-2025.05.01-x86_64-Secure_Boot.iso (sha256: dec9c0411da9f96e987269a984301d632bc0bc4cd727ce21c824a8ca6a2dcd94)
After flashing the image to the drive, boot into the installation medium. Connect your drive to the system (for VM, mount the iso image directly, no need to prepare a flash drive) and reboot the system. Soon after turning on your system, run the boot menu and select the drive. The Boot Menu can be accessed using the Boot Menu key (usually ESC, F9 or F12).
MOK Util (Secure Boot)
When you boot using the Secure Boot image, you should see this screen if secure boot is enabled.
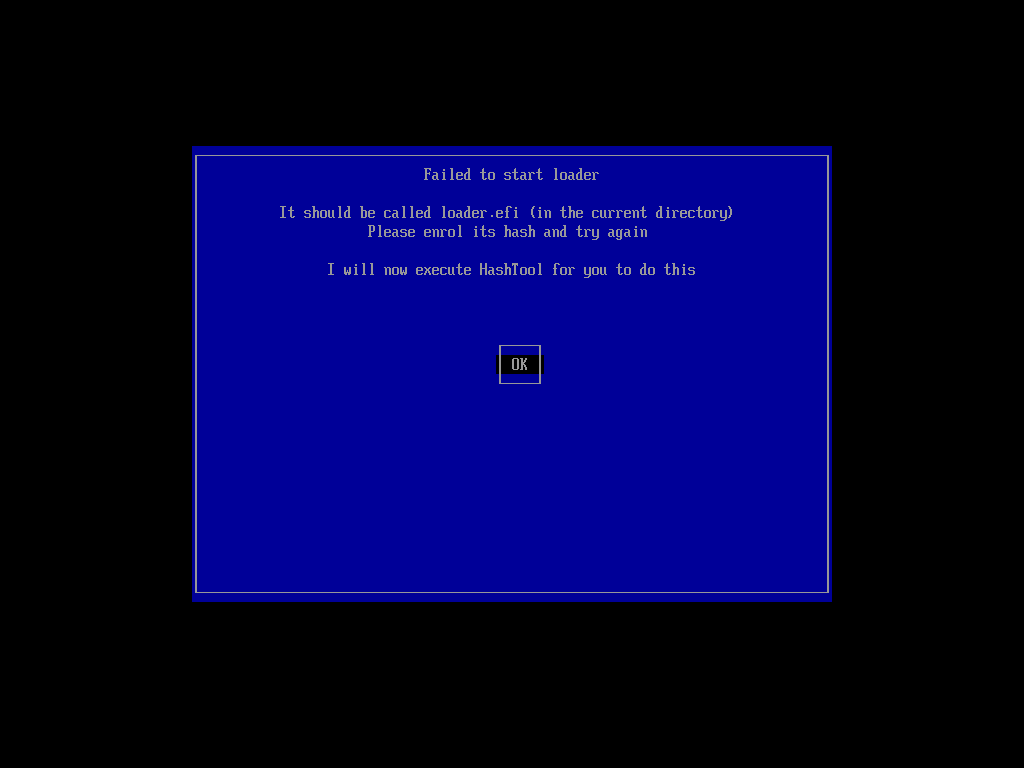
Click on Enroll Hash. Select loader.efi and enroll it’s hash. Next navigate to arch directory. Enroll the hash of vmlinuz-linux. This is the linux kernel.
Reboot after this and you should be greeted by GRUB.
Hash Tool Demo
Partitioning
Read this section carefully before action. Do not blindly copy paste the commands. Mistakes could result in data loss. Proceed with caution
Partioning is an important step in the installation procedure. One has to be careful not to tamper the partitions used by other Operating Systems installed in the system. There are a lot of ways to partition the drive, but a minimal UEFI setup requires atleast two partitions.
/: The root partition/boot/efi: The efi partition
A UEFI system should have a FAT32 formatted partition called the efi partition. This partition acts as the storage place for the UEFI boot loaders, applications and drivers to be launched by the UEFI firmware. However, even for a dual boot setup, a system can have only one efi partition. This means if you’re dual booting Arch with Windows, make sure to mount the existing efi partition to /boot/efi and don’t accidentally format it.
The root partition can be formatted as ext4, xfs or any other as per your preference. Note that setting up LUKS Encryption or a btrfs file system or an LVM partioning might be more complicated and outside the scope of this guide. Follow the Arch Wiki for more info.
In Linux, there’s a unique name for each hard disks. Usually HDDs are denotes as /dev/sda, /dev/sdb and so on. SSDs will be /dev/nvme0n1, /dev/nvme0n2 and so on. Partitions are identitied by adding a number to these names. For instance the first partition of the first HDD on the system would be /dev/sda1. Keep this in mind before you start partition.
I’m familar with parted for partitioning via the command line, so this guide will be following that.
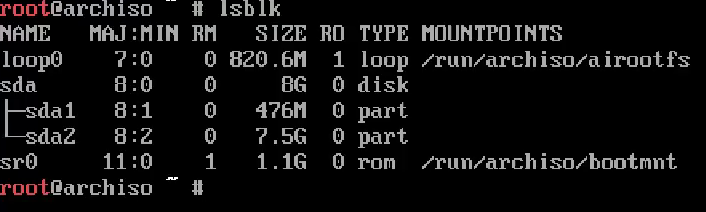
Viewing Partitions and Disk Info
Use the lsblk command to view the block devices on the system.
1
2
lsblk
lsblk -o NAME,UUID,PARTLABEL,FSTYPE,MOUNTPOINT
Creating Partitions
To format the drive as GPT for UEFI
1
2
# WARNING! Don't do this if you're dual booting the system. This will format the entire drive
parted <dev> mklabel gpt
To view existing disk info and partitions
1
parted <dev> print # Replace <dev> with the disk ex: /dev/sda
To create a new parition.
1
2
# Replace <start> with the end of the parition before it, for an empty disk use 0G. Replace <partname> with a name of your choice
parted <dev> mkpart <partname> <start> <start+size>
To delete a partition
1
parted <dev> rm <number> # Replace <number> with the partition number
Formatting the Partitions
Use the mkfs command to format the partions.
1
2
3
4
mkfs.ext4 <rootpart> # Replace <rootpart> with your root partition ex: /dev/sda2

# WARNING! Do not do this step for dual boot setup. Rather mount the efi partion directly
mkfs.fat -F 32 <efipart> # Replace <efipart> with your efi partition ex: /dev/sda1
Mount the Partitions
1
2
3
4
mount <rootpart> /mnt # Replace <rootpart> with your root partition ex: dev/sda2

# You can find your existing efi partion using lsblk command. It will be a FAT32 formatted partition
mount --mkdir <efipart> /mnt/boot/efi # Replace <efipart> with your efi partition ex: /dev/sda1
Examples
Please do not copy this blindly and paste it to your system. Please check your existing partions and disk info before you continue.
Partition Demo
pacstrap
The installation medium offers a tool called pacstrap. This tool helps us download the latest packages and install them to another drive. This step basically prepares our root partition.
Arch wiki recommends base, linux and linux-firmware packages for a basic installation. We however need more packages including a bootloader to use the OS.
1
pacstrap -K /mnt base linux linux-firmware grub efibootmgr sbctl networkmanager man tldr nano sof-firmware wget curl
You can also install os-prober to let GRUB find other OSs on the disk (like Windows) for effective dual boot setup
Potential Issue: pgp signature errors
If you face errors related to pgp signatures while installing, try these steps
1
2
3
4
pacman-key --init
pacman-key --populate archlinux

rm -r /var/cache/pacman/pkg/*
Basic Configuration
Now that the packages are installed, we have to configure the system.
Generating fstab
/etc/fstab file tells the system about the drivers to be mounted during boot. This file is therefore essential. Luckily, Arch Linux offers another tool for us to do this easily.
1
genfstab -U /mnt >> /mnt/etc/fstab
After this, chroot into the system to complete rest of the configuration. chroot basically means to create a virtualized copy of an OS. So we’re basically shifting our shell to the new installed OS to complete configuration.
1
arch-chroot /mnt
Time Zone, Locale, Keyboard and Hostname
We set the time zone by creating a soft link of the Region and City to /etc/localtime
1
2
ln -sf /usr/share/zoneinfo/<Region>/<City> /etc/localtime # Replace <Region> and <City> with your Timezone ex: Asia/Kolkata
hwclock --systohc # This synchronizes the hard clock
Next, we have to set our system locale. Edit the /etc/locale.gen file and uncomment the locales you need. Use locale-gen to generate locale afterwards.
1
2
nano /etc/locale.gen # You probably need to uncomment this line: LANG=en_US.UTF-8
locale-gen
Next, we have to configure the console keyboard layout.
1
nano /etc/vconsole.conf
For default US keyboard, add these lines
1
KEYMAP=us
You can check other layouts and font options on the Arch Wiki.
Finally, configure your system hostname. This name will be used as your system name for bluetooth pairing, networking and most other services. You might also see this at your terminal <username>@<hostname>
1
2
3

# Edit the file and just type in your system name to be used as hostname. No spaces or newlines
nano /etc/hostname
Bootloader Installation
Next we have to install the bootloader. In this guide, we use GRUB.
UEFI Without Secure Boot
1
2
grub-install --target=x86_64-efi --efi-directory=/boot/efi --bootloader-id=ARCH
grub-mkconfig -o /boot/grub/grub.cfg
UEFI With Secure Boot
Read this section carefully before action. Do not blindly copy paste the commands. Mistakes could potentially brick your system
There are a lot of ways to do this as clearly documented in the Arch Wiki. I’m doing this by disabling shim-lock on GRUB and I use sbctl to generate custom keys to load them to the BIOS. I believe this is one of the easiest ways to do this.
Some modern systems like Dell offers a Audit Mode which makes the BIOS keys writeable. After enabling this, you can use sbctl commands to enroll the keys.
In older systems, you need to delete all the existing Secure Boot keys. This puts the system on Setup Mode after which you can use sbctl to enroll your keys along with Microsoft’s keys to the BIOS. While you may be a Microsoft hater, please don’t skip uploading Microsoft’s Secure Boot keys as the firmware of some external pheriperals like graphics cards also rely on Microsoft’s Secure Boot keys. They won’t be able to work without Microsoft’s keys.
The GRUB modules specified here are required for standard OS installations. I was able to get most of the required modules thanks to Ubuntu and Arch Wiki.
First create keys and enroll them to your BIOS. The BIOS must be in Audit Mode as mentioned above to enroll keys.
1
2
3
4
sbctl create-keys
sbctl enroll-keys -m # WARNING! Don't forget the -m flag. Doing so could potentially brick your system

# The -m flags appends Microsoft's keys to the db as well. These keys are required for loading firmware for some peripherals like GPUs
Next install GRUB and sign the GRUB efi file and the kernel (vmlinuz-linux). Whilst installing GRUB, you need to mention some modules. These modules provide extra capabilities to GRUB like lvm for loading lvm disks. It is better to mention commonly used modules to avoid errors later on. This list is taken from the Ubuntu script and is enough for most cases.
1
2
3
4
5
6
7
8
9
10
11
12
13
14
15
16
17
18
19
20
21
22
23
24
25
26
27
28
29
30
31
32
33
34
35
36
37
38
39
40
41
42
43
44
45
46
47
48
49
50
51
52
53
54
55
56
57
58
59
60
61
62
63
64
65
66
67
68
69
70
71
72
73
74
75
76
77
78
79
80
81
82
83
84
85
86
87
88
89
90
91
92
93
94
95
96
97
98
99
100
101
102
103
104
105
106
107
108
109
110
111
112
113
114
#!/bin/bash


efi="/boot/efi"
kernel="/boot/vmlinuz-linux"
grub_id="ARCH"

CD_MODULES="
	all_video
	boot
	btrfs
	cat
	chain
	configfile
	echo
	efifwsetup
	efinet
	ext2
	fat
	font
	gettext
	gfxmenu
	gfxterm
	gfxterm_background
	gzio
	halt
	help
	hfsplus
	iso9660
	jpeg
	keystatus
	loadenv
	loopback
	linux
	ls
	lsefi
	lsefimmap
	lsefisystab
	lssal
	memdisk
	minicmd
	normal
	ntfs
	part_apple
	part_msdos
	part_gpt
	password_pbkdf2
	png
	probe
	reboot
	regexp
	search
	search_fs_uuid
	search_fs_file
	search_label
	sleep
	smbios
	squash4
	test
	true
	video
	xfs
	zfs
	zfscrypt
	zfsinfo
	tpm
	"


GRUB_MODULES="$CD_MODULES
	cryptodisk
	gcry_arcfour
	gcry_blowfish
	gcry_camellia
	gcry_cast5
	gcry_crc
	gcry_des
	gcry_dsa
	gcry_idea
	gcry_md4
	gcry_md5
	gcry_rfc2268
	gcry_rijndael
	gcry_rmd160
	gcry_rsa
	gcry_seed
	gcry_serpent
	gcry_sha1
	gcry_sha256
	gcry_sha512
	gcry_tiger
	gcry_twofish
	gcry_whirlpool
	luks
	lvm
	mdraid09
	mdraid1x
	raid5rec
	raid6rec
	"


grub-install --target=x86_64-efi --efi-directory=$efi --bootloader-id=$grub_id --modules="$GRUB_MODULES" --disable-shim-lock
grub-mkconfig -o /boot/grub/grub.cfg

# I forgot where I got this wonderful solution from, I will update soon as I find it
# sed -i 's/SecureBoot/SecureB00t/' /boot/efi/EFI/GRUB/grubx64.efi # Uncomment this if you still face Secure Boot violation issues

# Uncomment this if you face perm issues even when on root)
#chattr -i /sys/firmware/efi/efivars/KEK-8be4df61-93ca-11d2-aa0d-00e098032b8c
#chattr -i /sys/firmware/efi/efivars/db-d719b2cb-3d3a-4596-a3bc-dad00e67656f

sbctl sign -s "$efi/EFI/$grub_id/grubx64.efi"
sbctl sign -s $kernel
If you can’t save this as a file and run it, you can download this script from DAWN Archives.
1
2
3
4
5
6
wget https://archive.dawn.org.in/Scripts/efi/install-grub-efi # sha256 checksum: 97b5b8737ab6fdda0653cbcc129041d48c609d1dad76f86142d6091ea92134e4
sha256sum install-grub-efi # Check whether the value is the same as 97b5b8737ab6fdda0653cbcc129041d48c609d1dad76f86142d6091ea92134e4
chmod u+x install-grub-efi

# Replace <efi> with your efi mount location and <kernel> with your kernel location ex: /boot/efi and /boot/vmlinuz-linux respectively
./install-grub-efi
Configure User Accounts
First let’s set a password for root. You can skip this setup if you’re confident about the user configuration step after this.
1
passwd root # Please don't forget this password
For a standard Desktop Experience, it is not recommended to work as the root user as it can cause unintended harm on the system. So let’s create a username and configure sudo for running administrator commands.
1
2
3
4
5
# Run this as root
pacman -S sudo
groupadd wheel
useradd -m -G wheel <username> # Replce <username> with a name of your choice
passwd <username>
After this edit /etc/sudoers and uncomment the line: %wheel ALL=(ALL:ALL) ALL
1
nano /etc/sudoers # Uncomment the line: %wheel ALL=(ALL:ALL) ALL
Now you should be able to login as the username you created and use sudo for administrator commands
Exit Installation Medium
After all this, exit from chroot and reboot the system.
Extras
Enable NetworkManager on Boot
Doing this might help you set up the network automatically on boot
1
sudo systemctl enable NetworkManager
Enable Bluetooth
You need to install Bluetooth packages and enable bluetooth.service. Yes, using Arch Linux means doing almost everything yourself.
1
2
sudo pacman -S bluez bluez-utils
sudo systemctl enable --now bluetooth
Fix Time Errors in Dual Boot Setup
You might notice time errors after switching between Operating Systems in the dual boot system. This is becuase Windows sets the system time (BIOS) as the same time zone, whereas Linux sets the system time to UTC. You can fix this by changing this behaviour on Linux.
1
timedatectl set-local-rtc 1
sbctl enrollment (Secure Boot)
Skip this section if you already followed UEFI With Secure Boot section.
Before you continue, turn on Audit Mode or Setup Mode for Secure Boot in BIOS settings.
Some modern systems like Dell offers a Audit Mode which makes the BIOS keys writeable. After enabling this, you can use sbctl commands to enroll the keys.
In older systems, you need to delete all the existing Secure Boot keys. This puts the system on Setup Mode after which you can use sbctl to enroll your keys along with Microsoft’s keys to the BIOS. While you may be a Microsoft hater, please don’t skip uploading Microsoft’s Secure Boot keys as the firmware of some external pheriperals like graphics cards also rely on Microsoft’s Secure Boot keys. They won’t be able to work without Microsoft’s keys.
Save this script as a bash file and run it. The GRUB modules specified here are required for your OS to function properly. I was able to get most of the required modules thanks to Ubuntu and Arch Wiki.
1
2
3
4
5
6
7
8
9
10
# Run all this as root
sudo su -
sbctl status
sbctl create-keys
chattr -i /sys/firmware/efi/efivars/KEK-8be4df61-93ca-11d2-aa0d-00e098032b8c
chattr -i /sys/firmware/efi/efivars/db-d719b2cb-3d3a-4596-a3bc-dad00e67656f
sbctl enroll-keys -m # WARNING! Don't forget the -m flag. Doing so could potentially brick your system
sbctl sign -s /boot/vmlinuz-linux
sbctl sign -s /boot/efi/EFI/GRUB/grubx64.efi
exit
After doing this restart your system and turn on Secure Boot if disabled. You might need to change the BIOS Secure Boot settings back to Deployed Mode. Your OS installation should now be secure boot protected!
Install and Configure Plymouth
Plymouth is a package in Linux responsible for showing the beautiful loading screen on boot. Follow these steps to install and configure it.
1
2
3
4
sudo pacman -S plymouth

# After installation, edit `/etc/default/grub` and modify `GRUB_CMDLINE_DEFAULT` line to "quiet splash"
sudo nano /etc/default/grub # GRUB_CMDLINE_LINUX_DEFAULT="quiet splash"
You can change plymouth themes using the plymouth-set-default-theme command.
Install Custom GRUB Theme
There are tons of grub themes on the internet. For this guide, I will show a demonstration using distro-grub-themes.
1
2
3
4
5
6
7
8
9
10
11
12
13
14
15
16
17
# Run this as root

git clone https://github.com/AdisonCavani/distro-grub-themes
cd distro-grub-themes/themes
mkdir -p /boot/grub/themes/distro-theme-grub # Create a dir for placing grub themes. This is the usual default
sudo tar -xaf <theme>.tar -C /boot/grub/themes/distro-theme-grub # Replace <theme> with a theme of your choice from the directory

# The repo contains a collection for grub themes all as tar archives. Select one you wish and extract them
# Previewing themes might prove to be default while on the installation device

# Cleanup after this. It's not a good idea to keep redundant data in /root
cd ../..
rm -r distro-grub-themes

# Edit `/etc/default/grub` and add/modify `GRUB_THEME` line to "/boot/grub/themes/distro-theme-grub/theme.txt"
sudo nano /etc/default/grub # GRUB_THEME="/boot/grub/themes/distro-theme-grub/theme.txt"
sudo grub-mkconfig -o /boot/grub/grub.cfg # Finally run grub-mkconfig to update changes
Firmware Updater - fwupd
Now that we have went this far to install with UEFI and even enable Secure Boot, we also use fwupd to update firmware via UEFI capsules
1
2
3
sudo pacman -S fwupd

sudo sbctl sign -s /usr/lib/fwupd/efi/fwupdx64.efi
After this, edit /etc/fwupd/fwupd.conf and append this to disable ShimLock
[uefi_capsule]
DisableShimForSecureBoot=true
AUR Helper - yay
Arch User Repository (AUR) is a collection of gits that host PKGBUILD files. PKGBUILD is a file that defines how a package must be built. AUR is a repository for hosting user defined PKGBUILDs. This will enable you to install packages not available in the official repos. Not all packages are purely built from binary and even has a bin or appimage variant. In simple words, you can use an AUR helper like yay to install apps. yay also searches the official repos first before AUR, so it can act as an all-in-one package manager
Please double check AUR packages before installing them. AUR packages can be hosted by anyone and can thus, unfortunately, be a venue for malwares as well
1
2
3
4
5
# Don' run this as root
git clone https://aur.archlinux.org/yay.git
cd yay

makepkg -si # Build the package from the PKGBUILD file
Follow instructions on the screen to continue installation.
Install a GUI
Arch Linux repositories host packages for most GUI environments. You can install one of them or even use them together. Here are some of the commonly used Graphical environments.
1
sudo pacman -S gnome gnome-extras

1
sudo pacman -S plasma

1
sudo pacman -S budgie
Conclusion
This guide show cover the basics of Arch Linux installation. As I mentioned before, some things could differ and be prepared to face system specific errors. Do let me know in the comments or seek help from the community online. Arch Wiki also remains as one of the best place to learn more, so do check it out.
Enjoy your Arch Linux experience and don’t forget to add the tagline I use arch btw wherever you go!
Feel free to comment below for suggestions, feedback and doubts.
DAWN/ペンギン